Category Archives: pickling

Wild Ramp Aioli

ramp1ONE OF THE BENEFITS of picking morels east of the Rockies is the chance to find ramps.
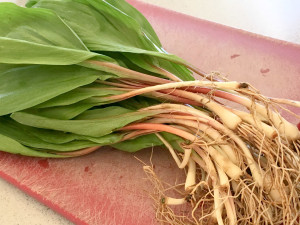
ramp4The wild leeks are beloved in the Appalachians, especially in West Virginia where nearly every little mountain town has a ramp festival, and in the northern woods of Michigan. On my last visit to the Upper Peninsula I picked ramps with friends from Marquette. But that was a while ago, and if there’s one wild food I wished was native to the Pacific Northwest, the ramp would be near the top of the list.

To make this wild ramp aioli I used pickled ramps. The recipe is a conflation of Earthy Delight’s version and Tartine’s. You can use fresh ramps, too.

3 pickled or fermented ramps*, with tops**
1/2 tsp dried mustard
1/2 tsp peppercorns
1/2 tsp apple cider vinegar
2 tsp lemon juice
1 egg yolk
1/3 cup grapeseed or canola oil
2 tbsp olive oil
salt to taste

1. Place food processor bowl and blade in freezer for 15 minutes if possible.

2. Chop ramps. (I used previously pickled ramp bulbs and fresh tops—see notes below.)

3. Add chopped ramps, dried mustard, peppercorns, cider vinegar, lemon juice, and egg yolk to food processor and process until well mixed together, about 30 seconds.

4. Combine oils and slowly add to processor. Ingredients should thicken to a mayo-like consistency. Continue to add oil. Add salt to taste and more lemon juice or vinegar if necessary.

5. Refrigerate in a tightly sealed container.

Makes enough to fill a 6-oz jelly jar.

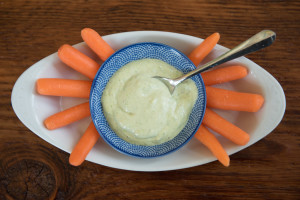
The ramp aioli will have the rich flavor and creamy consistency of a typical aioli or mayonnaise, but with the added garlicky bite of wild ramps. Using just the yolk and not the egg white will give it more body. For a chunkier aioli with flecks of bright green ramp tops, don’t over-process (unlike mine pictured above).

* Pickled Ramps recipe:
ramp2

1lb ramps
1 cup white wine vinegar
1 cup water
1 cup sugar
1 tsp mustard seed
1 tsp coriander seed
1 tsp fennel seed
2 tsp mixed peppercorns
1 bay leaf
1 tbsp salt


1. Cut off root tips from ramps and trim leaves, leaving just a little green. Reserve tops for another use. Rinse ramps.

2. Blanche trimmed ramps in a pot of salted boiling water for 30 seconds. Remove and quickly shock under cold tap. Pat dry and place in a pint-sized canning jar.

3. Combine pickling ingredients in saucepan and bring to a boil. Pour over ramps and set aside to cool. Seal tightly and refrigerate up to two months.

** If using fresh ramps for the aioli, cut off the tops (the green leaves) and then blanche the tops in boiling water for 30 seconds, shock under cold tap, and squeeze out excess water before adding to food processor.

Quick Asian Pickled Fiddleheads

THIS IS A SIMPLE way to put up lady fern fiddleheads.

I’ve used other pickling recipes in the past, but this is my new favorite for its ease, texture (i.e. crunch), and a perfect balance between salt and sweet.

One of the benefits of the quick pickle method is that the fiddleheads aren’t subjected to a withering hot water bath. The obvious downside is that this is a refrigerator pickle and you can’t keep them in the cupboard.

2 packed cups fiddleheads, cleaned
1 cup rice vinegar
1 tsp salt
1/2 tsp sugar
2 half-pint jars

A note on cleaning fiddleheads: It’s imperative that you remove as much of the brown, hairy, and bitter-tasting sheath that adorns the fiddlehead as possible. The easiest way to do this is to immerse them in a bowl of water and then rub each fiddlehead with thumb and forefinger to clean. Neatly trim the ends afterward.

1. In a pot of salted water, parboil cleaned fiddleheads for 30 seconds. Drain and shock in cold water before draining again and removing to paper towels.

2. Mix pickling brine of rice vinegar, salt, and sugar. You can omit the salt and sugar by using pre-seasoned rice vinegar, or experiment to taste.

3. Pack 2 half-pint jars with fiddleheads and cover with pickling brine. Refrigerate overnight.

Pickled Kelp

WHILE CAMPING at Deception Pass State Park, we came across a six-foot long strand of bull whip kelp (Nereocyctis luetkeana) that had washed ashore. The kelp was still in good shape, so we bagged it up and took it home.

Healthy kelp forests are the old-growth stands of the ocean. A hundred feet or more in length from sea floor to surface, they support a diversity of life. I’ve seen this diversity first-hand while free-diving in Puget Sound. Lingcod, greenling, and rockfish forage among the kelp forests; sea otters, seals, and other critters seek refuge from predators; and countless invertebrates make their homes there.

Our find immediately put me in mind of Jennifer Hahn’s Pacific Feast: A Cook’s Guide to West Coast Foraging and Cuisine. Sure enough, when we got home I thumbed through my copy and found this recipe for pickled kelp. Imagine a typical bread-and-butter pickle, with its crunch and spicy sweetness, and add to it a subtle hint of the sea. After tasting these pickles, you’ll look at a seaweed-strewn beach in a whole new way.

I cut Jennifer’s recipe in half since my strand of kelp was on the small side, and I probably could have cut it in half again.

2 cups kelp rings
1 1/2 cups white vinegar
1 clove garlic, diced
1 1/2 tbsp pickling spice
2 tsp turmeric
1 1/2 cups white sugar
1/2 red onion, cut in crescents

1. Make the brine. Mix vinegar, garlic, spices, and white sugar in a sauce pan. Set aside.
2. Cut the kelp into foot-long sections. Peel each section with a potato peeler.
3. Slice each peeled section into 1/4-inch rings.
4. Add the kelp rings into the brine and set aside for 2 hours, stirring occasionally.
5. After brining for 2 hours, boil contents for 5 minutes.
6. Spoon kelp rings and juice into canning jars and process in hot water bath for 10 minutes.

The pickles cure in three weeks, although we couldn’t wait; after just a week in the jar they tasted darn good and brought back fine memories of a sunny long weekend at the beach.

Note: check state and local regulations before harvesting seaweeds. In Washington it’s only legal to harvest beached bull whip kelp; cutting a living kelp stipe is illegal.

Sichuan Pickled Sparassis


CAULIFLOWER MUSHROOMS (Sparassis sp.) are deliciously nutty and they can be huge, with a firm texture that doesn’t soften with cooking like so many other species. Even after braising in a stew for an hour they remain al dente, which is a good way to describe the texture since this mushroom resembles nothing so much as a bowl full of cooked egg noodles.

Those wavy protrusions and deep clefts are expert at trapping duff and forest debris, making the cauliflower one of the more difficult mushrooms to clean. Worms like them too. The trick, as with so many tasty mushrooms, is to find them before the insects do—or else cut away the infestations as best as possible.

Sichuan peppercorns are the key ingredient. Not really pepper, the spice is actually the husk of a type of berry widespread through Asia. When consumed, it gives the mouth and lips a numb tingling feeling that works well with other hot spices commonly found in Sichuan foods.

1 lb cauliflower mushroom, boiled for a few minutes and cut into pieces
1 lb Napa cabbage, pulled apart and cut into 2-inch squares
1/2 lb diakon radish, sliced into 1/4-inch thick half-moons or matchsticks
2 carrots, sliced on an angle into 1/4-inch thick ovals
6-8 hot peppers cut in half and de-seeded
1/4 cup sliced ginger
2 tbsp Szechuan peppercorns
2 tbsp vodka
6-8 cups water, boiled and cooled
3 tbsp salt

Mix the brine and Szechuan peppercorns in a large tupperware or other non-reactive container. Stir in vodka; this is strictly for sanitary reasons. Add vegetables, fungi, and spices, making sure they are immersed completely in the brine. Cover and store at room temperature for 3-5 days. After the initial pickling, the contents can be refrigerated for 2 weeks.

Pickled Porcini


IF YOU WANT TO pick mountain porcini in the Cascades, you best keep your ear to the wall. No one casually gives up their patches. It’s hard enough to predict where and when the buggers will fruit as it is.

A couple weeks ago while picking huckleberries I got a tip from some hikers that a lot of mushrooms were fruiting to the south. The next day made an educated guess about where to go. Mountain porcini like high elevations, and they’re picky about tree composition. True firs and spruce are the ticket. After a three-mile hike I started to see them—first some blown-out flags in the sunny areas and then fetching number one buttons emerging out of the duff in more shaded spots.

When picking porcini, always make sure to field dress them right away. I trim the end to check for worm holes, then cut the mushroom in half. Often a pristine looking bolete will show signs of bugs once you slice it open, but the infestations will just as often be local to a small area of the cap or stem that can be trimmed away. Whatever you do, don’t simply put a porcino in your basket to trim later at home. I’ve learned the hard way that a basketful of beautiful buttons can be a worm-ridden mess by the time you get home if you don’t deal with the bugs immediately.

By the end of the day I had nearly ten pounds of mostly perfect porcini buttons (having thrown away twice that amount as too far gone). What a dilemma! I had more porcini than I could use. Some I cooked, some I gave away, and the rest got pickled.

Pickled Porcini

My friend Cora, who stars in the morel hunting chapter of Fat of the Land the book, passed this recipe along to me from his father’s cousin, who lives in Cortemiglia, Italy. She gathers twenty to fifty pounds of porcini annually, so putting up is a must. 

1 pound fresh porcini buttons, halved or quartered
1 cup white vinegar
1 cup water
salt
olive oil
2 lemon peels per jar
2 dried red chili peppers per jar
1/2 tsp peppercorns per jar
(optional) other fresh herbs and spices such as thyme or oregano

1. Clean and cut up porcini buttons, then spread on a baking sheet. Cover generously with salt and set aside for at least an hour, until the mushrooms have shed much of their water. Drain and lightly rinse under tap in a colander.

2. Bring vinegar and water to boil. There should be enough liquid to cover mushrooms. Increase amounts for larger batches, keeping the ratio of vinegar to water at 1:1. Simmer porcini for 2 – 3 minutes. Drain on paper towels and set aside to dry for a few hours.

3. Pack sterilized jars with porcini, lemon peels, chili peppers, and peppercorns, then fill with olive oil (try both extra virgin and light olive oils to determine taste preference). Keep refrigerated.

Pickled Sea Beans

SEA BEANS (Salicornia sp.) are known by many names: beach asparagus, glasswort, pickleweed, samphire. They’re a succulent, salt-tolerant plant that grows along beaches, marshes, and mangroves around the world. In my region we find sea beans near the high tide mark along sandy or pebbly Puget Sound beaches.

Fresh, they make a crunchy seaside snack, and they retain that pleasing texture even after cooking. The flavor,  is subtle, a salty taste of the sea with a hint of wild green. I like sauteed sea beans mostly for the texture, the bright color, and the salt, as in oyster succotash.

Sea beans also make a colorful garnish. Pickling them means you can have sea beans whenever inspiration strikes. 

Spicy Pickled Sea Beans

For the Southwest version I adapted a fairly standard pickling recipe for spicy green beans:

4 handfuls sea beans
4 red chiles
6 garlic cloves
pinch peppercorns per jar
pinch coriander seeds per jar
pinch mustard seeds per jar
4 sprigs fresh dill
1 1/4 cup water
1 1/4 cup white wine vinegar

1. Sterilize jars and lids in boiling water.

2. When jars are cool enough to handle, add pinches of coriander, mustard, and peppercorns. Pack half full with sea beans. Insert chiles, garlic cloves, and dill around outside edges. Finish packing with sea beans.

3. Bring water and vinegar to a boil. Ladle over the sea beans leaving about 1/2-inch head space. Wipe jar edge clean and screw on sterilized lids.

4. Process in a boiling water bath for 10 minutes. Remove and allow to cool completely at room temperature. Check lids for proper seal. Store for at least one month before using to allow flavors to develop.

Yields 2 pints.

Asian Pickled Sea Beans

sea beans
rice vinegar
1 tbsp sugar per cup of vinegar
3 1-inch slices ginger per jar
1 star anise per jar

Figure on using at least 1 cup of vinegar for 2 half-pint jars. Oh, and rice vinegar and rice wine vinegar are essentially the same thing, in case you were wondering.

1. Sterilize jars and lids in boiling water.

2. When jars are cool enough to handle, pack with sea beans. Insert ginger slices around edges and a single star anise at top.

3. Bring rice vinegar and sugar to a boil. Ladle over the sea beans leaving about 1/2-inch head space. Wipe jar edge clean and screw on sterilized lids.

4. Process in a boiling water bath for 10 minutes. Remove and allow to cool completely at room temperature. Check lids for proper seal. Store for at least a few days before using to allow flavors to develop.

Word of warning: If you don’t own a dedicated canner with a rack (i.e. you use a big ‘ol pot instead, like me) be very careful with your jars to avoid breakage. I discovered this the hard way. Because the contents of the jars—the sea beans—are packed cold, your jars can experience a terrible fate called thermal shock and pop their bottoms off. Not pleasant. Keep the jars in the hot sterilization water until ready, pack them, don’t overscrew the lids (you know what I mean), then place carefully in the pot before bringing to a boil. In restaurant/software speak, this is called a “soft launch.”

And don’t forget to use any leftover sea beans post-pickling. They make a salty garnish, or you can saute them in butter and garlic with a drizzle of lemon juice for a side dish. To leech out some of the salt, try blanching and shocking in two changes of water.

Pickled Fiddleheads

IF YOU LIVE IN the Seattle area, next time you’re at a farmers market look for the Foraged and Found Edibles booth and pick up a copy of Christina Choi’s Wild Foods Recipe Calendar, with illustrations by Emily Counts. This month-by-month catalog of the Pacific Northwest’s wild cornucopia is a treasure trove of recipes and information. 

I tried the Pickled Fiddleheads recipe first.

The biggest challenge of fiddleheads isn’t finding and picking them—that’s relatively easy once you have an understanding of their habitat (moist woodlands, stream banks, swampy areas). No, the hardest part is cleaning the curly little buggers. (Before and after photos below.) 

Here’s a cleaning tip: Use two large bowls filled with water. Soak your fiddleheads in one and use the other as a rinsing dish. The chaff will come off easily enough with a little rubbing. When chaff begins to accumulate in your rinsing bowl, strain it out. This tedious sink-side work will be paid off handsomely with a pickled batch of springtime fiddleheads.

1 lb fiddleheads, cleaned
2 lemons
1 1/2 cups water
1 1/2 cups wine vinegar
1/3 cup sugar
2 tbsp kosher salt
8-inch piece wild ginger (optional)
1 tsp whole black pepper
1 tsp coriander seeds
1 tsp whole allspice
1/2 lb shallots, sliced 1/8 inch thick
4 pint jars with lids and screwcaps, sterilized

1. Remove strips of lemon zest with a peeler, then juice lemons.
2. Pack fiddleheads tightly into canning jars, layered with shallots and lemon zest.
3. Bring to boil water, vinegar, lemon juice, sugar, salt, spices, and optional ginger.
4. Pour over fiddleheads so that liquid reaches to within a 1/4 inch of rim, then secure lids and process in hot water bath for 10 minutes.