Category Archives: plants and herbs

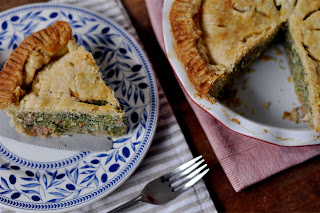
Italian Nettle Sausage Pie

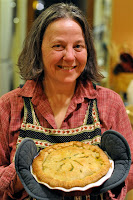
AND I ALWAYS thought baking was for control freaks. Silly me. Kate McDermott—aka the Pie Lady—is not your typical baker. She doesn’t worry about humidity or get hung up by exact measurements. She goes against the grain, which is her way. It’s more of a Zen thing. “Feel the dough,” she likes to say, only half-kidding.


I learned a lot during our pie-making session, and though I won’t go so far as to say my new skills are ready for prime time, Kate has put me on the path to a fresh understanding of baking with her pie-making mojo. 

1 pound sweet Italian sausage
4 large cloves garlic, chopped
3 leeks, thinly sliced (discard green tops)
6 eggs
20 oz stinging nettles, blanched and squeezed dry
4 cups shredded mozzarella cheese
1 cup ricotta cheese
1 tsp teaspoon salt
1/4 teaspoon pepper
fresh nutmeg to taste
2 tsp lemon juice
1 10-inch pastry for a double crust pie
1 tablespoon water

1. In a skillet over medium heat, saute sausage, leek, and garlic.

2. Separate one egg and set the yolk aside. In a mixing bowl, beat the egg white and remaining eggs. Mix in nettles, mozzarella cheese, ricotta cheese, salt, pepper, nutmeg, red pepper flakes, lemon juice, and sausage mixture.

3. Line a deep 9 or 10-inch pie dish with bottom pastry (with a 9-inch dish you will likely have leftover filling). Add filling. Cover with top pastry. Trim, seal, and flute edges. Cut slits in top. Beat water and remaining egg yolk; brush over top.

4. Bake at 425 degrees for 20 minutes, then lower heat to 400 degrees for another 30 minutes or until crust is golden brown and filling is bubbly. Let stand for 10 minutes before cutting.

Wild Indian: Stinging Nettle Paneer & Porcini Chana Masala

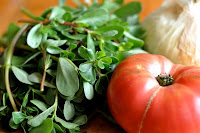
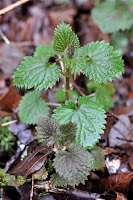
SOMETIMES A KITCHEN experiment yields better results than you ever imagined. Substitute stinging nettles for spinach and you may never feel quite the same about a standard Saag Paneer again.

Stinging Nettle Paneer


3/4 lb paneer, cut into cubes
1 large onion
3-4 cloves garlic
1 4-inch thumb of ginger, peeled
2 tbsp vegetable oil, plus extra for frying paneer
3-4 cardamom pods, crushed
1/2 tsp cumin seeds
1/4 tsp ground cinnamon
1/8 tsp ground cloves
1-2 plum tomatoes, diced
20 oz boiled nettles, drained
1/2 tsp turmeric
1 tsp ground cumin
1 tsp ground coriander
1 heaping tsp garam masala
1 tsp black pepper
1-2 tsp salt
1 cup, more or less, heavy cream or yogurt or a mix
cilantro for garnish

1. In a food processor, pulverize the onion, garlic, and ginger into paste.

2. Over medium heat, saute paste in oil for a few minutes in heavy-bottomed saucepan. Add cumin seeds, cardamom, cinnamon, cloves, and tomatoes, and cook for a minute or two, stirring occasionally.

3. Squeeze out excess water in boiled nettles. You’ll have a clump about the size of a baseball. Chop up by hand or with a food processor; I like mine well chopped, but not overly pulverized.

4. Add nettles to pan, along with tumeric, cumin, coriander, garam masala, black pepper, and salt. Stir together well.

5. Meanwhile fry paneer cubes in a little oil until lightly browned, then add to nettle mixture just before serving.

6. Finish over low heat with heavy cream or yogurt to desired consistency. Garnish with fresh cilantro.

***


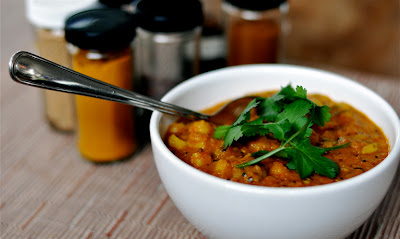
Porcini Chana Masala

1/2 pound porcini mushrooms (or cremini), roughly chopped
1 can (14 oz) chickpeas, drained
1 medium onion
3-4 cloves garlic
1 4-inch thumb fresh ginger, peeled
2 tablespoons vegetable oil
2 teaspoons black mustard seeds
1 teaspoon fennel seeds
1 teaspoon cumin seeds
1 teaspoon coriander seeds
1 can (14 oz) diced tomatoes, drained
1 teaspoon ground turmeric
1/4 teaspoon ground cinnamon
1/8 tsp ground cloves
1/4 tsp cayenne pepper
1 tbsp lemon juice
1 tsp salt
1 tbsp brown sugar (optional)
1 cup (or more) water, stock, cream
cilantro for garnish

1. With a food processor make a paste with onion, garlic, and ginger.

2. Heat oil over medium heat in a large skillet. Add black mustard, fennel, cumin, and coriander seeds, and toast until mustard seeds start to pop (about 30 seconds or so). Note: do not overcook spices in oil or the curry will be bitter. Immediately add paste and tomatoes. Cook until liquid evaporates and mixture begins to brown.

3. In a separate pan, saute mushrooms in a little oil or butter until lightly browned. Add to skillet along with chickpeas. (I used previously sauteed and frozen porcini, and added directly after thawing.)

4. Add turmeric, cinnamon, cloves, cayenne pepper, lemon juice, salt, and a cup or so of water if necessary.

5. Cook uncovered over medium-low heat for 15 minutes. Adjust seasonings.

6. I finished my curry with a tablespoon of brown sugar and a half can (about a cup) of coconut milk, for a slightly sweeter curry. Garnish with fresh cilantro.

Cooking Indian at home can seem like a recipe for failure. All those spices! If you’re new to Indian cuisine, the first step is to visit your local spice store. You’ll want to have the basics: turmeric, cumin seeds, cardamom pods, ground coriander, garam masala, and so on. The amount of spices and seasonings will be overwhelming at first, but a little practice and before long you’ll be making your own adjustments to once-obscure seeming spices in a given recipe based on personal preference.

My New Column

In their infinite wisdom—or maybe a moment of deadline and coffee-induced weakness—the editorial folks at Seattle Magazine have handed over a few column inches to this here foraging scribbler. It’s called…drumroll…”Cook’s Adventures.” Every other issue I’ll be taking readers on a jaunt to some of my favorite outdoor grocery stores to sample the wild foods therein.

For the inaugural column we stay close to home, just sticking a toe in the swirling currents of adventurous gastronomy. “Weed Eater” is a tour of my backyard—and probably yours too. Bottom line: Don’t compost those dandelions. Eat them!

Yesterday on Seattle’s King 5 TV, I spoke with Margaret Larson on New Day Northwest about the new column, taste-tested a few backyard weeds with the studio audience, and cooked up a batch of Stinging Nettle Soup. Coming in May: Morels!

Rose Hip Jelly

I’VE NEVER SEEN as many wild rose hips as I saw in the upper Skeena watershed of British Columbia this fall. I was there to fish for steelhead and I suppose I might have earned a few raised eyebrows if I’d put down my rod and spent more time picking hips, but when opportunity knocked I made sure to fill a bag. 

A rose hip is the seed pod of the rose, and nearly as attractive as the flower it replaces. It’s famously loaded with vitamin C. Last year I made rose hip syrup. This year, jelly.

I used less sugar than many recipes call for because I like the tanginess of the hips. I chose jelly for the warm, diaphanous color, because it was easiest, and I was short on time, but a marmalade-like jam would be a good choice too.

Double this recipe for a better time-to-output ratio.

6 cups rose hips
4 cups water
2 1/2 cups sugar
1/2 packet pectin
1/3 cup lemon juice (1 lemon)
3 to 4 8-oz canning jars
 

1. Wash and stem the rose hips, then cover with water (4 cups in this case) in a stainless steel pot and simmer for an hour or so until the hips are soft and easily mashed with a potato masher.

2. Strain the liquid. A jelly bag is ideal, but a combination of strainers and cheese cloth will get the job done. I used a food mill for the first pass and then lined a fine mesh strainer with a double layer of cheese cloth. After the liquid passed through I balled up the remaining mash and squeezed out the juice. The point is to extract as much juice and as little pulp as possible. This yielded 2 cups of juice.

3.  Return juice to pot. Add lemon juice and pectin and bring to a boil. Add sugar and continue to boil for a minute or so while stirring. Remove from heat, skim off any foam, and immediately ladle into sterilized jars.

4. Secure lids and process jars in hot bath for 10 minutes.

Angel Dust: Fennel Pollen

You hear the same old quote repeated endlessly about fennel pollen, something about the sprinkling of spice from the wings of angels. Let’s just call it angel dust. You remember that stuff from late-night cop movies—a drug that made users goofy and totally out of their heads. Like truffles, saffron, and a handful of other exotic, pricey, and painstakingly harvested goodies, fennel pollen enjoys the same reputation in certain quarters.

I happened on a patch of wild fennel in late July when I was scouting locations for a class on urban foraging, part of a summer course offered by Cornish College of the Arts in Seattle called “The Art of Food.” I was looking for ripening blackberry bushes in the downtown core when I saw these towering thickets of yellow blooms adjacent to a parking lot in the International District. Sure enough, the blooms—some of them several feet high and buzzing with bees—turned out to be wild fennel plants.

Who knows how they got here. They might have been planted on purpose long ago by Italian immigrants who populated my own nearby neighborhood in Rainier Valley, when small agricultural plots still existed within the city limits, a place fondly remembered as Garlic Gulch. Fennel is technically a weed in this country but it’s native to the Mediterranean and has always been a favorite vegetable and spice of Greek, Italian, and other culinary traditions from that region.

I don’t have much experience with fennel pollen. I’ve eaten meats dusted with it in restaurants and that’s about it. In my car I found a pair of scissors and some paper grocery bags (always useful to have nearby) and set to work. Basically I just looked for the best blooms and snipped them at the stem right below the flower head. It didn’t take long to collect two full grocery bags of flowers. These I bunched together with the blooms facing down into the bag, stems tied. For the next several days I allowed the flowers to drop their tiny orange pellets of pollen and occasionally gave the bags a shake to speed the process along, a tip I gleaned from this article.  By the end of the week I had accumulated about three tablespoons of the stuff. That’s not a typo: 3 tbsp! Go crazy, huh.

The thing of it is, though, you don’t need much fennel pollen to jazz up a cut of meat or add an ineffable savoriness to vegetables. For my first try I used a couple teaspoons with pork chops (considered a classic combo in the Old Country) on a bed of sauteed broccoli from the garden. I rolled the fatty end of the chops in the pollen before grilling, then dusted the remnants on the broccoli as it cooked in the pan. One of the chops—the control—was left untreated as a comparison.

I can say that the pollen added an almost sweet dimension to the pork chops with its hint of anise, though in this forager’s opinion it was the broccoli that really shined; somehow that fennel fairy dusting gave the veggies a brightness, an aliveness, that they otherwise would have lacked. The rest of my pollen, all two-plus tablespoons, went into a spice jar, awaiting the next experiment. While I don’t expect to become an angel dust junkie anytime soon, you know what they say about pollen being a gateway drug…

Strawberry Fields

While hunting porcini the other day in the Colorado Rockies we stumbled on a large patch of wild strawberries (Fragraria sp.). Score! It seems I never find wild strawberries back home before the animals get to them, but for whatever reason we hit the jackpot on this less familiar ground.

The strawberry is one of those edible plants little improved by domestication. Sure, garden varieties are more prolific, with bigger berries, but their taste seldom rivals the complex strawberry flavor of their wild progenitors. In fact, the native strawberry patch is a perfect place for a wild food skeptic to have a Demascan Road moment—the small red, intensely flavorful berries are an object lesson in the providence of nature and testament to the fact that our tinkering is not always an improvement. My friends, who were along for the mushroom hike, had never eaten wild strawberries before and were quite simply blown away that something this delicious could be growing so inconspicuously on the forest floor.

Wild strawberries are found through much of the temperate world and across most of North America. Look for them in clearings, forest margins, and along roadsides and trails. Though frequently found in shady woods, they need ample sunlight to fruit. Woodland critters crave them as much as we do and my experience has been that the biggest obstacle to eating a handful of wild strawberries is not in locating the plants but in returning at just the right time to pluck ripe berries before the squirrels and rabbits and box turtles finish them off.

If your timing is good, you’ll find the next difficulty is living beyond the moment and putting a few aside for later to top pancakes and so on. The hand-to-mouth impulse proved too strong for us. There would be no conveying any berries home. Instead we happily sat in the dirt and gathered handfuls to eat as fast as we could pick.

Sassy Saskatoons

Sassy might be overstating it. More like solid. Saskatoon berries and their close relatives in the Amelanchier genus fruit in 49 of 50 U.S. states (sorry Hawaii) and what they lack in edge or mystery they gain in abundance and flexibility. Saskatoons can be used in pies, cobblers, jams, sauces, and really whatever you require of a versatile berry, including pemmican. But get this: they’re not really a berry…
 
Saskatoons (Amelanchier alnifolia) are more commonly known as serviceberries, sarvisberries, juneberries, or shadbush on the Atlantic Coast where they flower right around the time the shad run. The fruits are pulpy and reminiscent of blueberries both in look and taste, although their seeds have a nutty flavor and botanists will tell you the fruits are actually pomes, making them relatives of apples and pears.
 
 
I missed the main fruiting of sakatoons in Washington this summer, but here in Steamboat Springs, Colorado, where we’re visiting the rellies, saskatoon berries are in full flush. Near the Sarvis Creek Wilderness—a place that might have been named for the abundance of sarvisberries—I fished the Yampa River for monstrous rainbows while Ruby and Marty loaded up on the berries. 
 
Harvesting saskatoons is one of those exercises in berry-picking that will restore your faith in the process after earning a case of carpal tunnel from red huckleberries: the berries are big and hang in clusters that make for easy pickins and quick buckets. That is, if it’s a decent crop. Some years the fruits are less than plentiful.

We made pie with ours.

Purslane Salad

THE BEST THINGS in life are free—and easy. Take this weed salad that uses purslane as the featured ingredient. It’s delicious in inverse proportion to the time and skill required to make it. Which is to say it’s really good and really simple.


First, a word about weeds. Most gardeners  are busy pulling purslane (Portulaca oleracea)l—and pulling their hair out, too, because like Himalayan blackberry purslane can never be vanquished. But it can be eaten. 

Here’s what you do. Pick a bunch of purslane, stem it (making sure to keep many of the leaf clusters intact), and toss it with a chopped sweet onion such as a Walla Walla and a large ripe heirloom tomato. That’s it. Season with salt and pepper and allow the tomato juice to form the dressing; squeeze a chunk of tomato into the salad if necessary to get the juices flowing.

You’ll be amazed by the results. Purslane has a crunchy texture and a complex flavor that marries perfectly with the acidic tomato juice and sweetness of the onion. Jon Rowley turned me onto this salad last summer at an oyster fest and we ate it again the other day when I dropped by his house to pilfer a few of the shoots for my own garden. 
 
That’s right, I’m planting weeds!

Wild Berry Tartlets


A MIXTURE OF foraged red huckleberries and trailing blackberries is the perfect combination of tart and sweet for these fun single-serving tartlets.

Tart Dough

1/2 cup flour
3 tbsp cold unsalted butter, cut up
2 tbsp confectioner sugar
2 tbsp cold water

Combine flour, sugar, and butter in a food processor and pulse until grainy. Add the water a tablespoon at a time to food processor while running. Pulse until dough forms. I used my hands at the end to finish combining what the Cuisinart missed. Roll into a cylinder, wrap in plastic, and refrigerate for 30 minutes minimum or up to a day.

Sweet Cheese

1 8-oz package cream cheese, cut into 8 pieces.
6 tbsp sugar
1 large egg yolk
1 1/2 tbsp flour
1/2 tsp vanilla extract
lemon zest of half a small lemon

Combine cream cheese and sugar in food processor. Whir until smooth. Add flour, egg, vanilla, and lemon zest and whir again until creamy.

Berry Topping

1 cup wild berries
2 tbsp sugar
2 tsp corn starch

Briefly cook berries with sugar and corn starch until juices are syrupy.

For the final tarts I took my dough out of the refrigerator and sliced it into a dozen disks. Each disk I flattened into a 3-inch diameter round on a lightly floured surface before pressing into a muffin tin and forming into a cup. Each little tart—tartlet, if I may be so bold—then got a dollop of sweet cheese filling before being topped with a spoonful of the cooked red huckleberries and a few fresh blackberries. I baked the tartlets for around 20 minutes at 400 degrees.


Oregon-grape Preserves

The state flower of Oregon looks like holly and grows throughout much of Cascadia. Anyone who spends time in the woods from Northern California up through British Columbia is familiar with its prickly green leaves, bright yellow blooms, and the tart berries that form in clusters in summer. It’s not exactly trail food. Pick a few berries on a hike and you’ll experience a lip-puckering flavor that gives new meaning to the term sour grapes. But tame it with sugar and you’ve got a whole realm of culinary possibilities.

Oregon-grape is not a true grape. Though its dark blue berries hang in grape-like clusters, that’s where the comparison ends. Members of the family Berberidaceae, the various species of Oregon-grape are also known for their medicinal qualities. The two species commonly encountered in the forests of the Pacific Northwest are the tall Oregon-grape (Mahonia aquifolium) and low Oregon-grape (Mahonia nervosa). Some botanists consider them part of the Berberis genus, which includes a variety of species commonly called barberries and which are renowned for containing berberine, a compound with cancer-fighting and anti-depressant properties, among other medicinal benefits.

To make Oregon-grape preserves wear gloves and harvest a good quantity of the berries. I picked five pounds or so from a patch behind my daughter’s pre-K, right in the center of Seattle. Use containers and utensils that won’t stain. Wash the berries and remove any large stems or other leafy debris. Put the berries in a pot and add just enough water so that the berries are barely covered. Boil for 15 minutes until soft, then run through a food-mill in batches. The food-mill should separate the juice and pulp from the skins and seeds.

Now you have a choice: You can further strain the juice from the pulp by using cheese cloth or a fine mesh strainer, or you can leave the pulp in to make a preserve more aptly called a spread. Next measure your juice. I had a scant 5 cups. In general you’ll want to add an equivalent amount of sugar, give or take depending on your taste. Try mixing in other fruits or berries, too, or even ginger. Bring your juice to a boil and stir in the optional lemon juice and pectin. I used about half of a 1.75 oz package. Next add the sugar, not all at once but slowly, tasting as you go until reaching your preferred balance between tart and sweet. Bring to a boil again, stirring thoroughly, and cook for a few minutes, then remove from heat and immediately ladle into sterilized jars. Process in a hot water bath for 10 minutes.

My measurements:

5 cups Oregon-grape juice and pulp
4 1/2 cups sugar
juice of 1 lemon (optional)
1 oz pectin

Yield: 3 1/2 pints

While Oregon-grape preserves look and taste a lot like your standard grape jelly, the flavor is more complex and full-bodied, with a sweetness that will please children and a tart edge suitable to a grown-up palate. I think it makes a terrific PB&J yet a dollop is equally at home on a fancy cheese plate.