Category Archives: plants and herbs

Bittercress: A Misnomer


I’m in Arkansas for spring break visiting the inlaws and loving the 70-degree weather down here. This place is a forager’s paradise. I’ll have more to say about that in future posts, but in the meantime I had a post about eating your weedies queued up minus the photos. Turns out all the shots are safe and sound in my camera…back in Seattle. So without further ado, Plan B.

See that weed at top, growing between the rungs of my ladder in the backyard? It’s all over Seattle. Apparently it’s all over Fayetteville, Arkansas, too, according to my limited canvassing of this university town in the Ozarks. In fact, various representatives of the genus Cardamine are common across much of North America and the world. And we might consider using that pinch of Latin when we talk about it, even if it makes us feel professorial and a bit much, because the common name is flat out wrong.

Bittercress. Whoever gave it the name bittercress never actually tasted it. According to Arthur Lee Jacobson: “Over 200 years ago, Linnaeus named a related English weed Cardamine amara, meaning bitter. Writers subsequently transferred the inaccurate name Bitter cress to ALL Cardamine species, and it is one of the largest genera in the mustard family.”

There are some 200 species of Cardamine. Like many other Brassicas, these little annuals and perennials are high in nutrients and have been used for centuries for medicinal purposes. In my region Cardamine hirsuta is the most common species, although I’m pretty sure the robust one in the photo is a different species, possibly Cardamine flexuosa.

All Cardamines are typically hot and peppery in a pleasant way that brings a simple salad to life. This is a plant to know and enjoy regardless of its misleading common name.

Gobo Mojo: Kinpira Gobo

ACROSS MUCH OF North America, burdock (Arctium sp.) is a common weed in overgrown fields and waste areas. It’s a biennial and can grow to immense size, with two-foot leaves and flower stalks up to nine feet tall. Like stinging nettles and poison ivy, many of us have memories of encountering burdock as kids—a sweater covered in burrs, say, or the chore of taking a wire brush to Fido after a romp in the patch.

Burdock roots grow deep, often more than two or three feet beneath the surface, and need to be coaxed out of the ground so as not to break. First-year roots are the ones to target for food; once the plant forms a flower stalk in the second year the root turns woody.

Kinpira Gobo

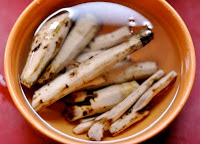
The Japanese are great lovers of burdock and ascribe many medicinal values to the root. It’s starchy like a potato and has the round, buttery flavor one associates with artichoke heart. There’s also a sweetness and even a faint citrusy edge. Kinpira Gobo is a traditional Japanese dish and easy to make. The addition of shichimi togarashi is recommended.

1/2 lb burdock root
1-2 carrots
1 tbsp vegetable oil
1 tbsp sesame oil
1 tbsp sake
1 tbsp mirin
1 tbsp soy
2 tsp sugar
1 tsp toasted sesame seeds
Shichimi togarashi (Japanese 7-spice blend), to taste (optional)

1. Lightly peel the burdock root, then julienne and remove to a bowl of water for 10 minutes.
2. Julienne carrots.
3. Heat oil in a wok or frying pan and stir-fry burdock for a few minutes. Stir in carrots and cook another minute or two before adding the remaining ingredients.
4. Stir-fry until the liquid has evaporated, leaving a glaze on the vegetables.
5. Serve immediately with a sprinkling of sesame seeds and shichimi togarashi.

You can also find commercially grown burdock in many Asian markets. The root will be longer, straighter, and prettier than wild burdock.

Green Gold: Miner’s Lettuce


The Forty-Niners put San Francisco on the map and explored north into much of California and the Oregon Territory. Most of them didn’t strike it rich. Instead they left their mark in the form of claims, place names, settlements—and in some cases environmental degradation that is still with us today.

Life was hard for a gold miner. You had to have your wits about you to survive. One of the many dangers was scurvy, caused by a deficiency of vitamin c. But the smart miner knew there was more than gold in them thar hills. There was green, too—a humble green (recently re-classified in the Claytonia genus) that grew in thick mats, was available much of the year, and packed the necessary nutrients a prospector needed to live in the bush.

Hello miner’s lettuce. Also called spring beauty, winter purslane, or Indian lettuce, Claytonia perfoliata, native to the western U.S., with particular abundance in the Pacific Northwest, is the best known species of miner’s lettuce. As one of the first spring greens to emerge, it’s a valuable edible just when it’s needed most.

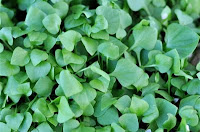
Pictures typically show Claytonia perfoliata with a round leaf from which a flower stalk emerges in the center. Early in the season, however, the leaves are more apt to be spade-shaped. They’re tender and succulent, reminiscent of spinach yet with a wild flavor that isn’t overpowering.

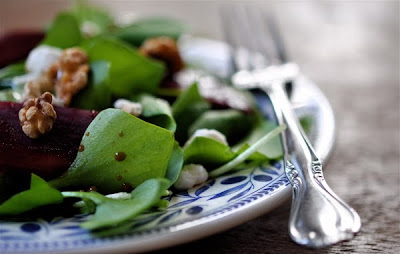
While I usually find my supply of miner’s lettuce when I’m hiking in the Cascades or Olympics, there are also patches right inside the Seattle city limits. I picked this bunch today in a park near Lake Washington and used it in place of spinach in a classic early spring salad with beets, goat cheese, roasted walnuts, and a simple vinaigrette.

Miner’s lettuce also has the distinction of being one of the few green foods, along with Stinging Nettle Soup, that my finicky, vegetable-averse boy will eat. If you haven’t eaten miner’s lettuce before, try a few leaves added to your usual salad. Soon you’ll be chucking the domestic greens altogether in favor of this wild treat.

Nettle Pesto Pops


I found a frozen packet of nettles from last year’s harvest in the freezer the other day. With all the fresh nettles we’ve been eating lately this seemed like an opportune time to see how a year-old hunk of frozen nettles tasted in comparison. I’m happy to report my dinner companions up the street didn’t blink. Not for a second did they wonder whether my potluck contribution of Cream of Stinging Nettle Soup wasn’t made from nettles picked that day (and I didn’t tell—shhhh). The day-glo green color and signature flavor would have fooled me too.

Score another point for free, nutritious food.

Speaking of frozen nettles, I wouldn’t have been able to make a soup with fresh nettles anyway because all of my harvest has gone into pesto production. There’s a reason for this. She’s four going on fourteen, cute as a button when she’s not terrorizing her parents or building elaborate homes for ponies and princesses out of the furniture, and she loves her daddy’s nettle pesto.

I’ve already posted a recipe for Stinging Nettle Pesto, but here’s more info/photos about putting up your pesto. Use a Ziploc with a corner cut off to fill each cavity of the tray, then put in the freezer for several hours. Once frozen the pesto cubes can be easily removed from the tray and stored in freezer bags, ready for use throughout the year.

Whenever Ruby wants her pesto fix, I simply grab a pesto pop from the freezer, heat it up in the microwave, and toss with a bowl of cooked pasta. A single cube is enough to coat a few servings of pasta.

If you want to make a large batch of nettle pesto just remember to harvest enough nettles. A grocery bag packed with freshly harvested stinging nettles yields about two ice trays of pesto plus a small tub.

Few meals are healthier or easier to make.

Nettle Gnocchi

TO RE-PHRASE an old saw, if the world gives you stinging nettles, make Nettle Gnocchi.

Whenever I make a potato-based gnocchi (as opposed to semolina-based) I’m always skeptical until the little pillows are safely plated and intact. So much can seemingly go wrong (though it usually works out).

Recipes for potato dumplings are more like guidelines. The important thing is to get a feel for the dough. I don’t think I’ve ever used the same amount of flour twice, and this is especially true when adding a wet ingredient such as boiled nettles to the mix. 

So think of the amounts below as estimates. I improvised on the same recipe as the one for Oxtail & Porcini Gnocchi. The best thing to do is start with less than the full cup of flour and then keep adding. You may end up using well over a cup as I did.

2 large Yukon Gold potatoes, boiled and peeled
1 egg, lightly beaten
1 cup nettles, boiled and chopped
1 cup or more flour
salt to taste

1. Boil nettles for a minute or two to neutralize sting. Remove to cold water. Next wring out excess water. Chop nettles, measure out a cup and then whir in a food processor.

2. Cut potatoes in half and boil in salted nettle water until tender, thirty minutes or more. Remove from water one at a time and peel. Break down potatoes with a fork and allow to cool. Make sure to attack lumps but don’t over-mash.

3. Mix nettles into potatoes by hand, a little at a time.

4. Sprinkle a handful of flour over your work space. Pull potato-nettle mixture into a mound on floured surface and make a volcano-like crater. Pour beaten egg into crater and sprinkle 3/4 of the flour over top. Start working the dough with metal spatulas or your hands, adding more flour and folding the dough into itself as you go. I find this step gets messy unless I make sure to use plenty of flour.

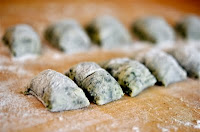
5. Split the dough into 5 or 6 balls. The dough is ready when you can easily roll out each ball into a long snake. Again, a work surface dusted generously with flour makes this easier. Now cut into pillows.

6. Add gnocchi to salted boiling water. (You can re-use your nettle-potato water.) When they float to the surface they’re done. Remove with a slotted spoon.

I ate my Nettle Gnocchi with two different sauces. A simple red sauce with grated parm works quite nicely, the acidity of the tomatoes marrying well with the high green note of the nettles.

But even better, in my opinion, is a sweet, herbed cream sauce. For this more decadent preparation, briefly sauté fresh chopped herbs (I used sage, thyme, rosemary, oregano, parsley, and chives) in butter, splashing with a little cognac that bubbles off (but not before leaving a pleasant sweetness), and finishing with heavy cream. Pour over the gnocchi and sprinkle with parmesan.

Vitamin C-Bomb

Right about this time of year is when the gate-crashing usually starts. My 4-year-old and 8-year-old bring the uninvited guests home from school. First sniffles, then coughs, and finally all-night hacking. The cycle repeats itself through the winter on a seemingly endless loop of crusty noses, balled-up tissue paper, and general grumpiness.

Whoever discovers a cure for the common cold will be richer than Midas, if not richer than the guy who can make hangovers go away, but in the meantime we’ve got vitamin C. It just so happens that rosehips—the red, globular fruit of the rose—have vitamin C in spades. I picked some the other day with food reporter Leslie Kelly, who writes for the Amazon food blog Aldente among other publications. This was urban foraging at its best, with good views of float planes landing on Lake Union and the Space Needle looming overhead. Leslie even filmed a bit of the action.

They say hips are at their best after first frost but I don’t have time to wait until Halloween before visitors scarier than trick-or-treaters start knocking at the door. With about a quart’s worth I made syrup. It’s pretty simple. First grind the hips in a food processor, then cover with water and simmer for 30 or so minutes before running the mush through a food mill and then straining out the pulp. You can save the pulp for other purposes. The strained juice goes back in the pot with sugar—or better yet, honey—to taste, and any other odds and ends such as cloves, cinnamon, or ginger—and voila: a Vitamin C-Bomb that can be mixed into juice or water for the kids—or used for more gustatory purposes in desserts, sauces, jams, or even cocktails.

So next time you’re out and about and you spy some of those bright red vitamin C-bombs, do the hip shake, babe.

Pickled Sea Beans

SEA BEANS (Salicornia sp.) are known by many names: beach asparagus, glasswort, pickleweed, samphire. They’re a succulent, salt-tolerant plant that grows along beaches, marshes, and mangroves around the world. In my region we find sea beans near the high tide mark along sandy or pebbly Puget Sound beaches.

Fresh, they make a crunchy seaside snack, and they retain that pleasing texture even after cooking. The flavor,  is subtle, a salty taste of the sea with a hint of wild green. I like sauteed sea beans mostly for the texture, the bright color, and the salt, as in oyster succotash.

Sea beans also make a colorful garnish. Pickling them means you can have sea beans whenever inspiration strikes. 

Spicy Pickled Sea Beans

For the Southwest version I adapted a fairly standard pickling recipe for spicy green beans:

4 handfuls sea beans
4 red chiles
6 garlic cloves
pinch peppercorns per jar
pinch coriander seeds per jar
pinch mustard seeds per jar
4 sprigs fresh dill
1 1/4 cup water
1 1/4 cup white wine vinegar

1. Sterilize jars and lids in boiling water.

2. When jars are cool enough to handle, add pinches of coriander, mustard, and peppercorns. Pack half full with sea beans. Insert chiles, garlic cloves, and dill around outside edges. Finish packing with sea beans.

3. Bring water and vinegar to a boil. Ladle over the sea beans leaving about 1/2-inch head space. Wipe jar edge clean and screw on sterilized lids.

4. Process in a boiling water bath for 10 minutes. Remove and allow to cool completely at room temperature. Check lids for proper seal. Store for at least one month before using to allow flavors to develop.

Yields 2 pints.

Asian Pickled Sea Beans

sea beans
rice vinegar
1 tbsp sugar per cup of vinegar
3 1-inch slices ginger per jar
1 star anise per jar

Figure on using at least 1 cup of vinegar for 2 half-pint jars. Oh, and rice vinegar and rice wine vinegar are essentially the same thing, in case you were wondering.

1. Sterilize jars and lids in boiling water.

2. When jars are cool enough to handle, pack with sea beans. Insert ginger slices around edges and a single star anise at top.

3. Bring rice vinegar and sugar to a boil. Ladle over the sea beans leaving about 1/2-inch head space. Wipe jar edge clean and screw on sterilized lids.

4. Process in a boiling water bath for 10 minutes. Remove and allow to cool completely at room temperature. Check lids for proper seal. Store for at least a few days before using to allow flavors to develop.

Word of warning: If you don’t own a dedicated canner with a rack (i.e. you use a big ‘ol pot instead, like me) be very careful with your jars to avoid breakage. I discovered this the hard way. Because the contents of the jars—the sea beans—are packed cold, your jars can experience a terrible fate called thermal shock and pop their bottoms off. Not pleasant. Keep the jars in the hot sterilization water until ready, pack them, don’t overscrew the lids (you know what I mean), then place carefully in the pot before bringing to a boil. In restaurant/software speak, this is called a “soft launch.”

And don’t forget to use any leftover sea beans post-pickling. They make a salty garnish, or you can saute them in butter and garlic with a drizzle of lemon juice for a side dish. To leech out some of the salt, try blanching and shocking in two changes of water.

Broiled Halibut with Red Huckleberry Compote

MORE TART THAN most other species of huckleberry, red hucks are good candidates for sauces and compotes. Plus, they look terrific atop a cut of meat or a fillet of fish.

While the most enduring way to enjoy huckleberry sauce (or compote) is with a game bird or pork loin, don’t forget about fish. It’s a sweet sauce as written, so adjust as necessary.

1 1/2 cups red huckleberries
1/4 cup port
1/2 cup sugar
1 tbsp balsamic
1/8 tsp cinnamon
1/8 tsp nutmeg
1 tbsp lemon juice
4 6-8 oz halibut fillets (or other white flakey fish)

1. In a saucepan bring ingredients to a boil over medium heat, lower heat, and reduce until syrupy. Keep warm until ready to serve. Makes enough sauce for 4 servings.

2. Slice halibut fillet into serving portions and arrange on a greased broiling pan. Season with salt and pepper, brush on melted butter, and drizzle with lemon juice. Broil 4 to 6 inches from burner, about 10 minutes per inch of fillet thickness.

Blackberry Crumble

THE NON-NATIVE Himalayan blackberry (Rubus armeniacus) thrives in these parts, to the point of being obnoxious.
But let’s look at the good side. Blackberries are delicious and free for the taking.

This is an easy recipe originally written for peaches. Use whatever fruit you want. The baking time seems long, but you want to make sure you get that crispy edge. Oven temps vary, so keep an eye on the topping. When it’s nicely browned it’s done.

4-5 cups fresh blackberries, rinsed
6 tbsp cold butter, cut into 1/2 inch chunks
3/4 cup brown sugar
2/3 cup flour
1/2 cup rolled oats
1/4 tsp salt
1/2 tsp nutmeg
1 tsp cinnamon

1. Grease an 8×8-inch baking dish. Layer bottom evenly with berries.

2. Combine dry ingredients in a large bowl. Cut in butter with pastry blender or knife. Sprinkle over berries.

3. Bake at 375 degrees until lightly browned and crispy on top, about 45 minutes. Serve with whipped cream or vanilla ice cream.


Spring Lamb with Morel Wine & Herb Sauce

While porcini hunting recently, I had good luck finding some exceptionally large morels in one drainage, with several larger than my hand. I found most of them near the elevation limit of the fruiting porcini, and I suppose if I had kept going up I might have found a bunch more, but my heart was set on porcini, so I picked these as a satisfying bonus—and made sure to mark my maps with notes for further investigation another time.

I got three meals out of these collateral morels, including this lamb dinner for six paired with large squares of semolina and chive gnocchi. For the gnocchi recipe, click here. A ladle of morel sauce finished the dish.

Lamb Marinade

6 Lamb chops, French-cut
3 tbsp olive oil
2 cloves garlic, chopped
1 tbsp sage, chopped
1 tbsp thyme, chopped
1 tbsp rosemary, chopped
salt and pepper, to taste

Season lamb with salt and pepper. Whisk together remaining ingredients and brush on both sides of lamb. Marinate 2 hours, then grill.

Morel Wine & Herb Sauce

1 lb morels, halved (or quartered if large)
1 tbsp olive oil
2 tbsp butter, divided
1 large shallot, diced
1 cup red wine
1 oz porcini, pulverized
1 1/2 cups warm water
1 heaping tbsp mascarpone (or 1/4 cup heavy cream)
splash Madeira, to taste (optional)
salt and pepper

Reconstitute porcini ahead of time in warm water and set aside for 30 minutes. Heat olive oil and 1 tbsp butter in skillet, then add diced shallot and morels. Cook, stirring occasionally, for 5 minutes over medium-high heat before pouring in red wine. Reduce by two-thirds, then add porcini stock, herbs, and a splash of Madeira. Lower heat to medium and cook several more minutes to reduce by half or so. Just before serving, stir in remaining butter and mascarpone. The sauce should thicken nicely and the butter will lend it an attractive sheen. Season with salt and pepper to taste. Serve with that red wine you’ve been saving for a special meal. Serves 4-6.