Category Archives: recipes

Wild Indian: Stinging Nettle Paneer & Porcini Chana Masala

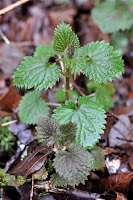
SOMETIMES A KITCHEN experiment yields better results than you ever imagined. Substitute stinging nettles for spinach and you may never feel quite the same about a standard Saag Paneer again.

Stinging Nettle Paneer


3/4 lb paneer, cut into cubes
1 large onion
3-4 cloves garlic
1 4-inch thumb of ginger, peeled
2 tbsp vegetable oil, plus extra for frying paneer
3-4 cardamom pods, crushed
1/2 tsp cumin seeds
1/4 tsp ground cinnamon
1/8 tsp ground cloves
1-2 plum tomatoes, diced
20 oz boiled nettles, drained
1/2 tsp turmeric
1 tsp ground cumin
1 tsp ground coriander
1 heaping tsp garam masala
1 tsp black pepper
1-2 tsp salt
1 cup, more or less, heavy cream or yogurt or a mix
cilantro for garnish

1. In a food processor, pulverize the onion, garlic, and ginger into paste.

2. Over medium heat, saute paste in oil for a few minutes in heavy-bottomed saucepan. Add cumin seeds, cardamom, cinnamon, cloves, and tomatoes, and cook for a minute or two, stirring occasionally.

3. Squeeze out excess water in boiled nettles. You’ll have a clump about the size of a baseball. Chop up by hand or with a food processor; I like mine well chopped, but not overly pulverized.

4. Add nettles to pan, along with tumeric, cumin, coriander, garam masala, black pepper, and salt. Stir together well.

5. Meanwhile fry paneer cubes in a little oil until lightly browned, then add to nettle mixture just before serving.

6. Finish over low heat with heavy cream or yogurt to desired consistency. Garnish with fresh cilantro.

***


Porcini Chana Masala

1/2 pound porcini mushrooms (or cremini), roughly chopped
1 can (14 oz) chickpeas, drained
1 medium onion
3-4 cloves garlic
1 4-inch thumb fresh ginger, peeled
2 tablespoons vegetable oil
2 teaspoons black mustard seeds
1 teaspoon fennel seeds
1 teaspoon cumin seeds
1 teaspoon coriander seeds
1 can (14 oz) diced tomatoes, drained
1 teaspoon ground turmeric
1/4 teaspoon ground cinnamon
1/8 tsp ground cloves
1/4 tsp cayenne pepper
1 tbsp lemon juice
1 tsp salt
1 tbsp brown sugar (optional)
1 cup (or more) water, stock, cream
cilantro for garnish

1. With a food processor make a paste with onion, garlic, and ginger.

2. Heat oil over medium heat in a large skillet. Add black mustard, fennel, cumin, and coriander seeds, and toast until mustard seeds start to pop (about 30 seconds or so). Note: do not overcook spices in oil or the curry will be bitter. Immediately add paste and tomatoes. Cook until liquid evaporates and mixture begins to brown.

3. In a separate pan, saute mushrooms in a little oil or butter until lightly browned. Add to skillet along with chickpeas. (I used previously sauteed and frozen porcini, and added directly after thawing.)

4. Add turmeric, cinnamon, cloves, cayenne pepper, lemon juice, salt, and a cup or so of water if necessary.

5. Cook uncovered over medium-low heat for 15 minutes. Adjust seasonings.

6. I finished my curry with a tablespoon of brown sugar and a half can (about a cup) of coconut milk, for a slightly sweeter curry. Garnish with fresh cilantro.

Cooking Indian at home can seem like a recipe for failure. All those spices! If you’re new to Indian cuisine, the first step is to visit your local spice store. You’ll want to have the basics: turmeric, cumin seeds, cardamom pods, ground coriander, garam masala, and so on. The amount of spices and seasonings will be overwhelming at first, but a little practice and before long you’ll be making your own adjustments to once-obscure seeming spices in a given recipe based on personal preference.

Winter Risotto with Black Trumpets

BLACK TRUMPETS ARE  the perfect garnish for this hearty yet slightly sweet winter risotto, along with fresh cold-weather ingredients such as butternut squash and arugula. The peppery greens temper the sweetness of the squash and the black trumpets add an extra dimension of earthy flavor that you won’t find in your typical recipe for Butternut Squash Risotto.


1 2-lb butternut squash, cut into 1/2-inch cubes
4 tbsp butter
1 large shallot, diced
1 clove garlic, minced
1 1/2 cups arborio rice
1/2 cup dry white wine
6-8 cups chicken or vegetable broth
1/3 cup Parmigiano-Reggiano cheese, grated
2 tbsp fresh sage, chopped
1 packed cup fresh arugula
1/4 lb black trumpet and/or yellowfoot mushrooms, rinsed

1. Peel and cut squash.

2. Warm stock in a pot.

3. Saute squash in 2 tablespoons of butter in a heavy-bottomed saucepan, covered, for 5 minutes over medium-high heat. Stir occasionally. Remove lid and cook a few more minutes to lightly brown squash.

4. Add shallot and garlic. Cook together with squash for a few minutes before deglazing pan with wine. Immediately add rice and stir thoroughly to coat. Reduce heat to medium.

5. Stir in a ladle or two of stock, repeating as the liquid is absorbed until rice is al dente.

6. While risotto is cooking, saute mushrooms in a tablespoon of butter. Set aside.

7. Finish risotto off-heat by stirring in sage, arugula, cheese, and last tablespoon of butter. Season with salt to taste. Garnish with sauteed mushrooms.

Serves 6

Rose Hip Jelly

I’VE NEVER SEEN as many wild rose hips as I saw in the upper Skeena watershed of British Columbia this fall. I was there to fish for steelhead and I suppose I might have earned a few raised eyebrows if I’d put down my rod and spent more time picking hips, but when opportunity knocked I made sure to fill a bag. 

A rose hip is the seed pod of the rose, and nearly as attractive as the flower it replaces. It’s famously loaded with vitamin C. Last year I made rose hip syrup. This year, jelly.

I used less sugar than many recipes call for because I like the tanginess of the hips. I chose jelly for the warm, diaphanous color, because it was easiest, and I was short on time, but a marmalade-like jam would be a good choice too.

Double this recipe for a better time-to-output ratio.

6 cups rose hips
4 cups water
2 1/2 cups sugar
1/2 packet pectin
1/3 cup lemon juice (1 lemon)
3 to 4 8-oz canning jars
 

1. Wash and stem the rose hips, then cover with water (4 cups in this case) in a stainless steel pot and simmer for an hour or so until the hips are soft and easily mashed with a potato masher.

2. Strain the liquid. A jelly bag is ideal, but a combination of strainers and cheese cloth will get the job done. I used a food mill for the first pass and then lined a fine mesh strainer with a double layer of cheese cloth. After the liquid passed through I balled up the remaining mash and squeezed out the juice. The point is to extract as much juice and as little pulp as possible. This yielded 2 cups of juice.

3.  Return juice to pot. Add lemon juice and pectin and bring to a boil. Add sugar and continue to boil for a minute or so while stirring. Remove from heat, skim off any foam, and immediately ladle into sterilized jars.

4. Secure lids and process jars in hot bath for 10 minutes.

Chanterelle Soup

THOSE GIANT LATE-SEASON chanterelles make for fun photos to share online, but mushroom hunters are often disappointed once they get their “flowers” back home to the kitchen. Big, soggy chanterelles cook up slimy!
 
One remedy is to make soup. Here’s an excellent recipe to neutralize the slime factor and get the most out of the last hunt.
 
There are plenty of Chanterelle Soup recipes that use exotic ingredients and techniques. This recipe is quick, easy, and delicious—and it highlights the main event, the mushrooms. You can make a complicated soup if you’d like. Then try this one.
 

6 tbsp butter, divided
1 med onion, diced
1 lb fresh chanterelles, diced
3 oz. dried porcini, rehydrated in 2 cups warm water (optional)
1/4 cup flour
4 cups beef stock
1/4 tsp white pepper
1/8 tsp ground nutmeg
salt to taste

1 cup or more heavy cream
 

1. Melt half the butter in a large pot. Add onions and cook over medium heat until caramelized.

2. Meanwhile pulverize porcini into dust with food processor and rehydrate in a bowl with warm water.

3. When onions are nicely caramelized add chanterelles and remaining butter, raise heat to high, and cook 5 minutes or so, stirring, until mushrooms have expelled their moisture. Cook off some of the liquid. The time required for this step will vary depending on how moist the mushrooms are. They should be slightly soupy before continuing to the next step.

4. Lower heat to medium and blend in flour with sauteed mushrooms and onions. Pour in beef stock slowly, stirring. Add porcini stock.

5. Bring to boil, then reduce to a low simmer. Add spices. Use an immersion blender to puree soup or blend in a food processor. The soup should be smooth and creamy.

6. Lower heat and add cream before serving.

Optional but highly recommended: In a separate pan, saute black trumpet mushrooms, chanterelles, or other wild mushrooms in butter for garnish and added texture. If you can get your hands on black trumpets, by all means do so. They taste a lot like chanterelles on steroids and add exceptional flavor to the soup.

Serves 4 – 6

Porcini and Eggplant Parmesan

THIS RECIPE IS based on Marcella Hazan’s Eggplant Parmesan recipe as a guideline. It’s decadent, with plenty of frying in oil. If that’s not your thing…well then, move along, nothing to see here.

1 large eggplant, sliced 1/4-inch thick lengthwise
1-2 large king boletes, sliced 1/4-inch thick lengthwise
flour
oil for frying
marinara sauce
1 lb mozzarella cheese, grated
1/2 cup grated parmesan cheese
fresh basil
salt and pepper
spaghetti

1. Heat oil in a large, deep-sided pan or skillet. Dredge eggplant and mushroom slices in seasoned flour. You may need to immerse mushroom slices in water before flouring. Fry in batches until golden, then remove to paper towels. (Note: Marcella recommends sprinkling eggplant slices with salt prior to frying so they release moisture; your call.)

2. Meanwhile prepare marinara sauce. You can take a shortcut and use a 28-oz can of store-bought sauce or make your own. We make our own simple red sauce by sautéing chopped garlic in olive oil, adding a 28-oz can of crushed tomatoes plus herbs, and simmering until the sauce attains desired taste and consistency. Add water as the sauce cooks down, and a pinch or two of sugar if necessary.

3. Grease a suitable baking dish. Line the bottom with a single layer of fried eggplant. Spoon over a third of your red sauce and top with half the mozzarella and a third of the parmesan. Dot with leaves of fresh basil. Repeat the layering, this time with all your porcini followed by another third of the red sauce, the rest of the mozzarella, another third of parmesan, and more fresh basil. Complete the final layer with the rest of your eggplant followed by the remaining red sauce and parmesan.

4. Bake for 30 minutes at 400 degrees. Remove from oven and allow to cool for several minutes.

Serve over spaghetti.

Grilled Matsutake

Matsutake, which means “pine mushroom” in Japanese, isn’t among my favorite of the wild edible mushrooms, but it’s fun to forage and I enjoy preparing it in traditional Japanese recipes.

Look for matsutake under conifers in well-drained, even sandy soils. Like porcini, it can be found near the ocean beaches of the Northwest and also in the mountains, especially in areas where volcanic soils are present. Matsutake fruits in other regions of North America including the woods of Maine and Ontario.

Though the Japanese prefer the mushroom in its button stage with gills entirely covered by the veil, I find that it becomes even more aromatic as the cap begins to open.

It has a singular aroma. David Arora of Mushrooms Demystified fame refers to it as “a provocative compromise between ‘red hots’ and dirty socks.” In my opinion this spicy cinnamon-like flavor marries with Eastern culinary ingredients such as soy, rice vinegar, shaoxing wine, and so on, better than Western dairy ingredients such butter, cream, and cheese.
 
Probably my favorite preparation is Matsutake Sukiyaki. Gohan is another way to showcase this unique tasting mushroom. But if you want to experience the flavor in the most dressed down way, try grilling it. Slice the mushroom and grill over low to medium heat until light golden. It should be slightly crispy on the outside with a moist, meaty inside. A dipping sauce of equal portions soy sauce and rice vinegar completes this simple and flavorful dish.

Game Hen with Chanterelles & Madeira over Parsnip Puree

OUT TO DINNER the other night, the chef came out of his kitchen to explain just how he liked to cook game hen (finishing it with a nob of sizzling butter was key, he said), and then, as we got to talking about mushroom hunting, it occurred to me that this same dish might go really well with a handful of button chanterelles. To make it more of a meal I added the parsnip puree.

1 game hen
2 tbsp butter
1 shallot, chopped
1/4 lb chanterelle buttons
splash Madeira
2 tbsp mascarpone
2 medium parsnips, peeled
heavy cream
salt and pepper
basil, chopped for garnish

1. Remove both legs (including thighs) of game hen, reserving rest of bird for another purpose. Pat dry, season, and saute over medium-high heat in half the butter, browning each side so the skin is dark and crispy and the meat tender. Add second tablespoon of butter to finish before removing legs to a plate and placing in 350 degree oven to keep warm.

2. While meat is cooking, cut parsnips into pieces, cover with water in small pot, and boil 15 minutes. Remove parsnips to food processor, add a spoonful of cooking water plus a little heavy cream, and puree.

3. Add chopped shallot to same pan and saute in pan juices until soft, a minute or two. Add mushrooms and stir. Cook another couple minutes before deglazing pan with a splash of Madeira wine. As wine and pan juices bubble and reduce, stir in a couple spoonfuls of mascarpone to thicken.

4. Remove meat from oven and pour any accumulated juices into mushroom sauce. Plate game hen leg over parsnip puree and top with chanterelles. Garnish with chopped fresh basil. Serves 2.

The fresh basil might seem a quixotic choice. It’s such a strong flavor, you rarely see it used as a garnish the way you see, say, parsley. But in this case it did a really good job of balancing the sweetness of the parsnip and brightening the overall dish. Basil peaked in or garden recently and we’re using it as much as possible; combined with the high season of chanterelles, the pairing seemed like a good idea—and indeed I plan to find other ways to bring these two ingredients together, idiosyncratic or not.

Porcini Risotto

WHILE RESEARCHING porcini risotto recipes, I was surprised to see how many ask you to cook the mushrooms first and then remove them from the pan before adding the risotto rice, as if they’re so fragile that they can only be added back into the dish later as a sort of frilly garnish on top.
 
Nonsense. The whole point is to allow the rice to take on the mushroom flavor as it cooks. Besides, even after a half-hour of cooking, fresh porcini mushrooms of good quality will retain their meaty texture. Why complicate the process?
 
Many recipes simply use dried porcini. This is fine out of season, though I would consider adding fresh mushrooms of some sort, even a bland supermarket variety like cremini, if only for texture. The best porcini risotto is the one that uses both fresh and dried porcini. Here’s mine:
 
8 cups chicken or vegetable stock
1/2 cup (approx 2 oz) dried porcini
1-2 tbsp olive oil
1 medium yellow onion, diced
2-3 cloves garlic, diced
1/2 lb fresh porcini, roughly chopped into 1-inch cubes
1/2 cup white wine
1 1/2 cups arborio rice
2 tbsp butter
4 heaping tbsp mascarpone
1/2 cup parmesan cheese, grated
1/2 cup (or more) sweet peas (frozen is fine)
salt and pepper, to taste
 

1. Warm stock just below simmer in a pot on stovetop.

2. Pulverize dried porcini in blender or food processor and add to stock.

3. In a large pan suitable for risotto, sauté onions, garlic, and fresh porcini in olive oil for several minutes over medium heat until mushrooms begin to brown ever so slightly, stirring regularly. I like to season the mixture with a few grindings of salt and pepper at this point.

4. De-glaze with white wine. When liquid has nearly bubbled off, add rice and stir well, coating thoroughly. Allow rice to cook until slightly toasted, 2-3 minutes.

5. Add 4-5 ladlefuls of stock to pan, stirring. It helps to have a risotto spoon. Reduce heat to medium-low. Continue to add a ladle or two of warm stock as the liquid is absorbed, stirring regularly, about 15 minutes.

6. Risotto is nearly done when creamy yet al dente. Now stir in the butter, mascarpone, and half the parmesan along with a couple more ladles of stock, then mix in the peas, and cover for a a minute.

The finished risotto should be rich and creamy. The peas add a dash of color and nice pops of texture as a counterpoint to the porcini and rice. Add salt if necessary. For an attractive and tasty garnish, thinly slice a couple small porcini buttons and saute in butter until lightly browned. For a soupier risotto, add more stock. Serve with remaining parmesan as a garnish. Serves 4.


Purslane Salad

THE BEST THINGS in life are free—and easy. Take this weed salad that uses purslane as the featured ingredient. It’s delicious in inverse proportion to the time and skill required to make it. Which is to say it’s really good and really simple.


First, a word about weeds. Most gardeners  are busy pulling purslane (Portulaca oleracea)l—and pulling their hair out, too, because like Himalayan blackberry purslane can never be vanquished. But it can be eaten. 

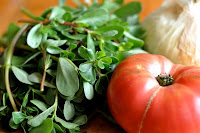
Here’s what you do. Pick a bunch of purslane, stem it (making sure to keep many of the leaf clusters intact), and toss it with a chopped sweet onion such as a Walla Walla and a large ripe heirloom tomato. That’s it. Season with salt and pepper and allow the tomato juice to form the dressing; squeeze a chunk of tomato into the salad if necessary to get the juices flowing.

You’ll be amazed by the results. Purslane has a crunchy texture and a complex flavor that marries perfectly with the acidic tomato juice and sweetness of the onion. Jon Rowley turned me onto this salad last summer at an oyster fest and we ate it again the other day when I dropped by his house to pilfer a few of the shoots for my own garden. 
 
That’s right, I’m planting weeds!

Wild Berry Tartlets


A MIXTURE OF foraged red huckleberries and trailing blackberries is the perfect combination of tart and sweet for these fun single-serving tartlets.

Tart Dough

1/2 cup flour
3 tbsp cold unsalted butter, cut up
2 tbsp confectioner sugar
2 tbsp cold water

Combine flour, sugar, and butter in a food processor and pulse until grainy. Add the water a tablespoon at a time to food processor while running. Pulse until dough forms. I used my hands at the end to finish combining what the Cuisinart missed. Roll into a cylinder, wrap in plastic, and refrigerate for 30 minutes minimum or up to a day.

Sweet Cheese

1 8-oz package cream cheese, cut into 8 pieces.
6 tbsp sugar
1 large egg yolk
1 1/2 tbsp flour
1/2 tsp vanilla extract
lemon zest of half a small lemon

Combine cream cheese and sugar in food processor. Whir until smooth. Add flour, egg, vanilla, and lemon zest and whir again until creamy.

Berry Topping

1 cup wild berries
2 tbsp sugar
2 tsp corn starch

Briefly cook berries with sugar and corn starch until juices are syrupy.

For the final tarts I took my dough out of the refrigerator and sliced it into a dozen disks. Each disk I flattened into a 3-inch diameter round on a lightly floured surface before pressing into a muffin tin and forming into a cup. Each little tart—tartlet, if I may be so bold—then got a dollop of sweet cheese filling before being topped with a spoonful of the cooked red huckleberries and a few fresh blackberries. I baked the tartlets for around 20 minutes at 400 degrees.